Whether you're spinning up a staging copy of a live site, moving a website to a new hosting provider, or duplicating a finished project as the starting point for a new one, WP Umbrella's Deployment feature lets you push any backup to a brand-new destination, all from a single dashboard. There's no need to manually export databases, wrangle FTP clients, or run search-and-replace queries by hand. WP Umbrella packages the backup, transfers it, imports the database, rewrites URLs, and verifies the result for you.
The deployment feature lets you:
Clone a site to a new domain or subdomain, creating an identical copy for staging, testing, or development.
Migrate a website to a different server or hosting provider without touching the command line.
Deploy to an empty destination or overwrite an existing install, since WordPress does not need to be pre-installed at the target.
Reuse saved destinations, storing encrypted credentials so you don't have to re-enter them on future deployments.
Run automated preflight checks that validate connectivity, restore-script access, and database credentials before anything is changed on the target site.

This guide walks you through deploying a WordPress backup from one site to a new destination, step by step.
Open the website in your WP Umbrella dashboard that you would like to clone, or that you want to migrate to a different server or hosting provider. In the left sidebar, click Backups to open the Backup overview page.
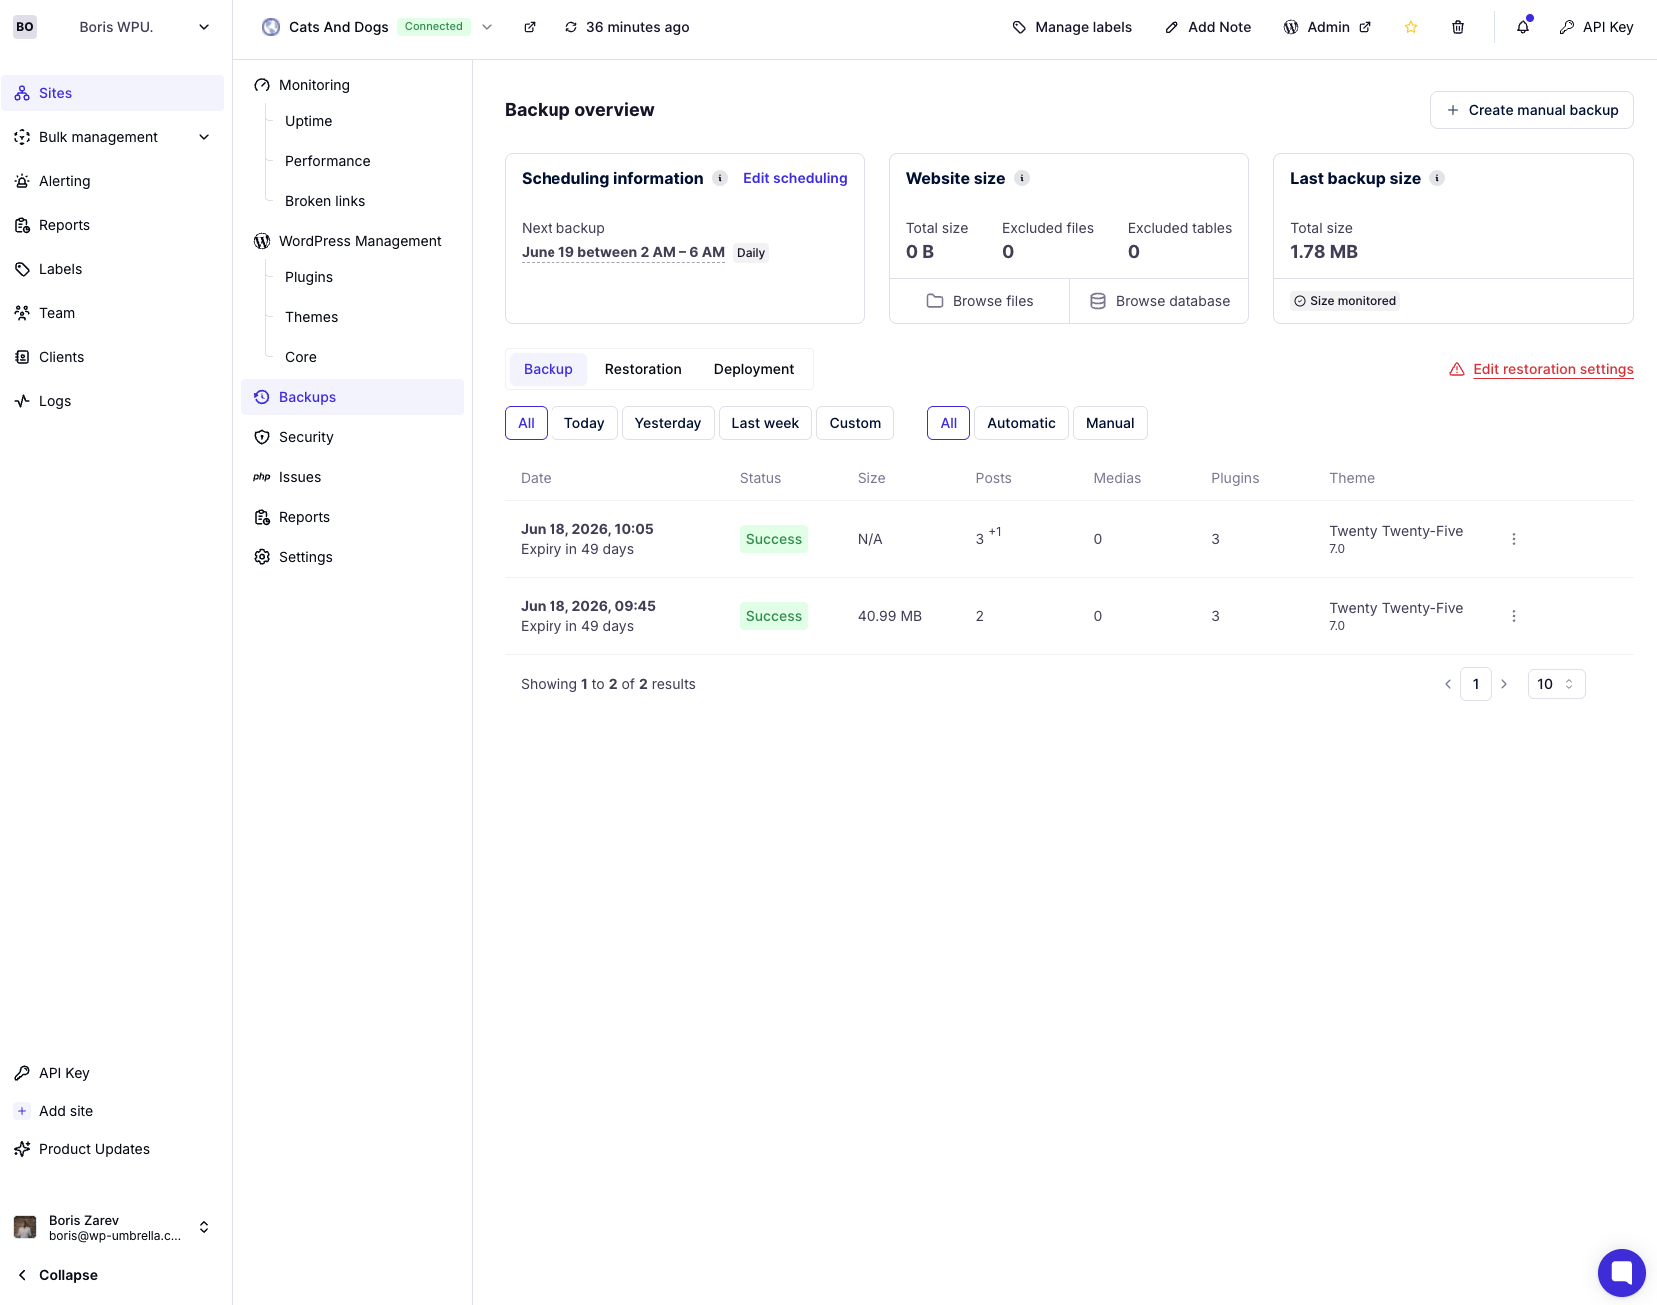
Here you'll see your scheduling information, website size, last backup size, and a full list of available backups, each showing its date, status, size, and the number of posts, media files, plugins, and the active theme captured in that snapshot.
Choose the backup you would like to clone the website from. Any successful backup in the list can be deployed.

If you need an up-to-the-minute copy, click + Create manual backup in the top-right corner to generate a fresh snapshot first, then deploy from that.
Each backup row has additional options accessible from the three-dot menu (⋮) on the right side. Click it to open the actions menu, then under the Deploy heading, select Deploy to another site.
This opens the deployment wizard, a guided, three-step process (Configure → Verify → Confirm) where you'll enter everything needed for the new destination:
Destination URL: the address where the backup will live
(S)FTP access: protocol, host, port, username, password, and path
Database information: host, database name, username, and password
On the Configure step, fill in all the required fields:
Destination URL: Enter the full URL of the site you want to deploy to (for example, https://cloned.yourdomain.com). Alternatively, pick a previously saved destination from the dropdown to auto-fill its encrypted credentials.
Server access ((S)FTP): Choose your Protocol (SFTP or FTP), then enter the Host, Port, Username, and Password. In the Path field, specify the root folder of your WordPress installation, the directory containing wp-admin, wp-includes, and wp-content.
Database: Enter the database Host (often localhost), Database name, Username, and Password for the destination.
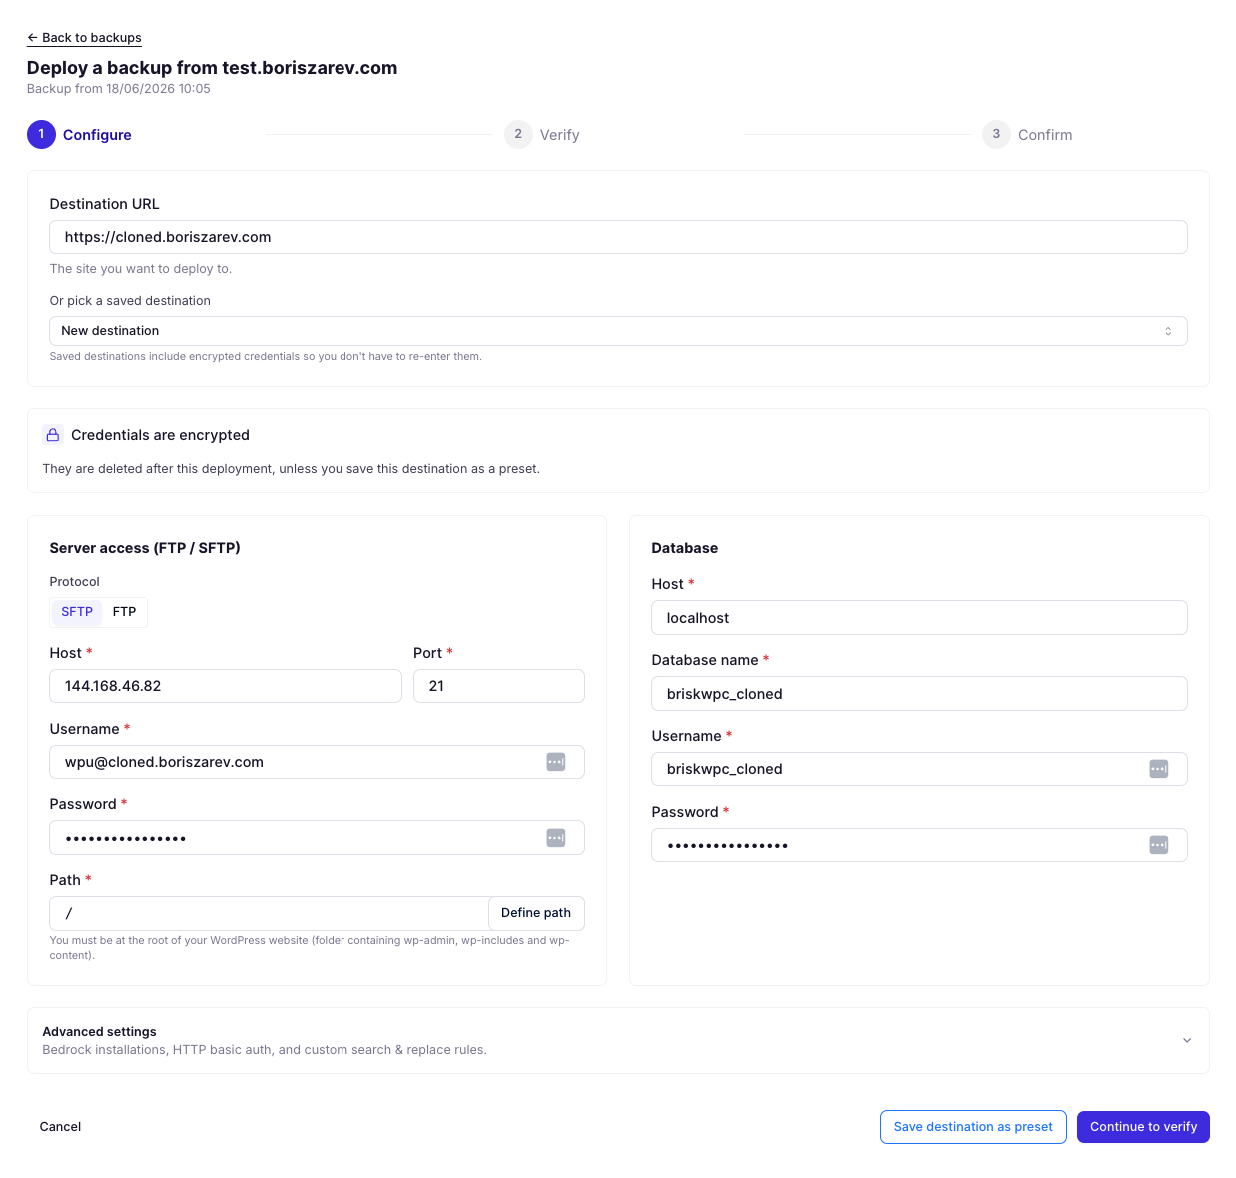
If your setup is non-standard, expand Advanced settings to configure Bedrock installations, HTTP basic authentication, and custom search-and-replace rules.
When everything is filled in, click Continue to verify.
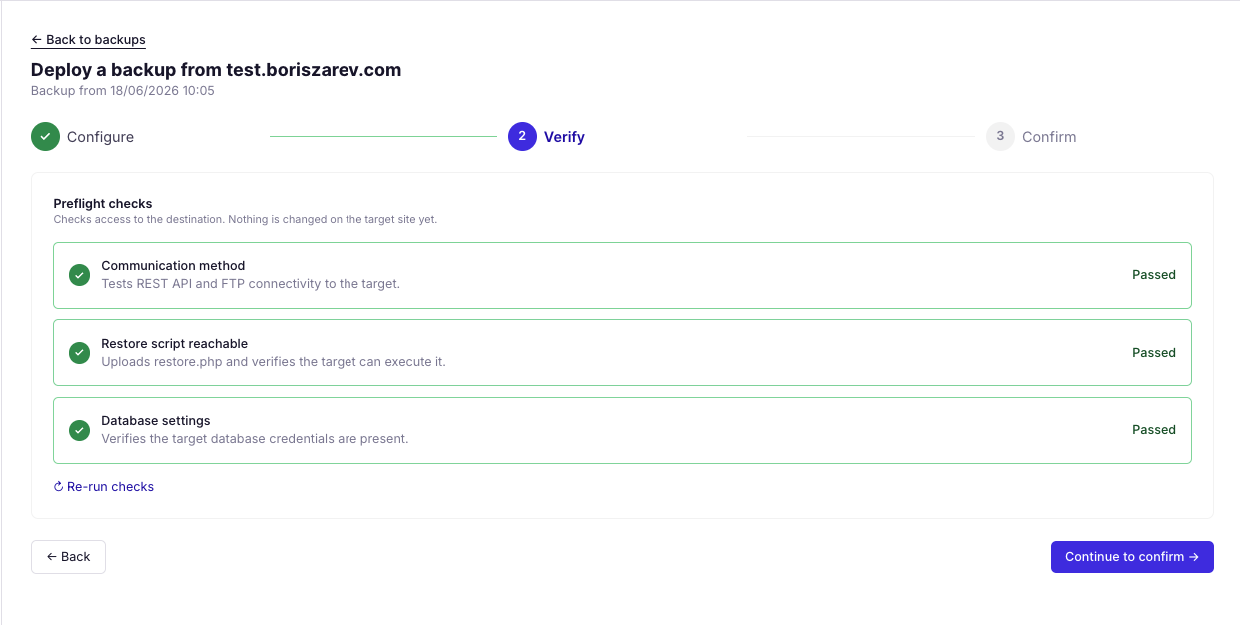
On the Verify step, WP Umbrella runs a series of preflight checks against the destination. Crucially, nothing has changed on the target site yet; these checks only confirm that WP Umbrella can reach and work with the destination:
Communication method: Tests REST API and FTP connectivity to the target.
Restore script reachable: Uploads a restore.php script and verifies the target can execute it.
Database settings: Verifies that the target database credentials are present and valid.
If every check shows Passed, click Continue to confirm. If any check fails, double-check the corresponding credentials on the previous step and click Re-run checks to try again.
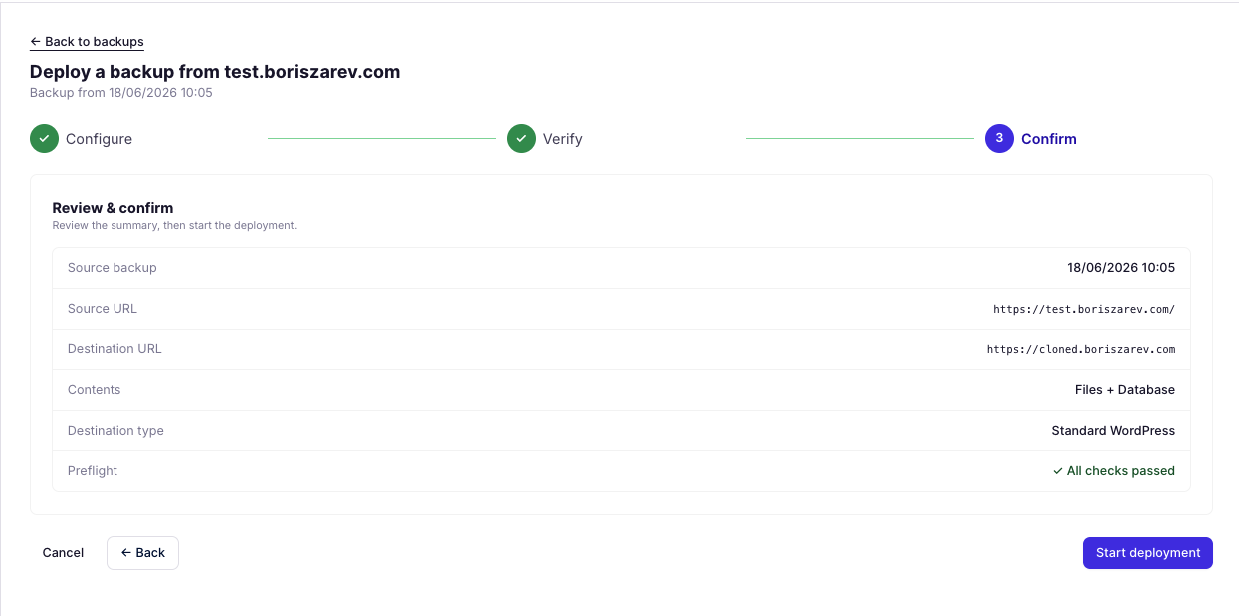
On the Confirm step, you'll see a Review & confirm summary listing:
Source backup: the date and time of the snapshot being deployed
Source URL: the original site
Destination URL: where the backup is going
Contents: what's included (e.g., Files + Database)
Destination type: e.g., Standard WordPress
Preflight: confirmation that all checks passed
Once you've reviewed the summary and everything looks correct, click Start deployment. WP Umbrella will begin transferring files and importing the database to the destination.
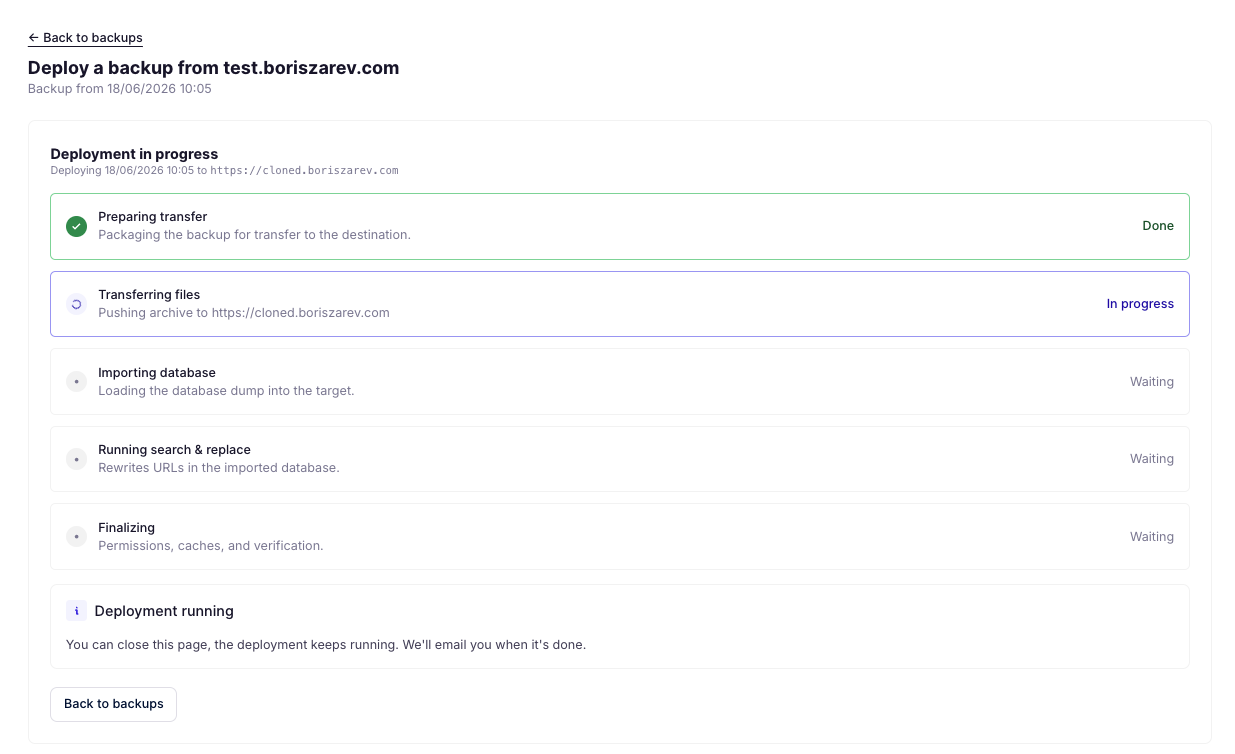
Watching the deployment progress
After you start, WP Umbrella shows a live progress view stepping through each phase:
Preparing transfer: Packaging the backup for transfer to the destination.
Transferring files: Pushing the archive to the destination URL.
Importing database: Loading the database dump into the target.
Running search & replace: Rewriting URLs in the imported database so they match the new domain.
Finalizing: Setting permissions, clearing caches, and running verification.
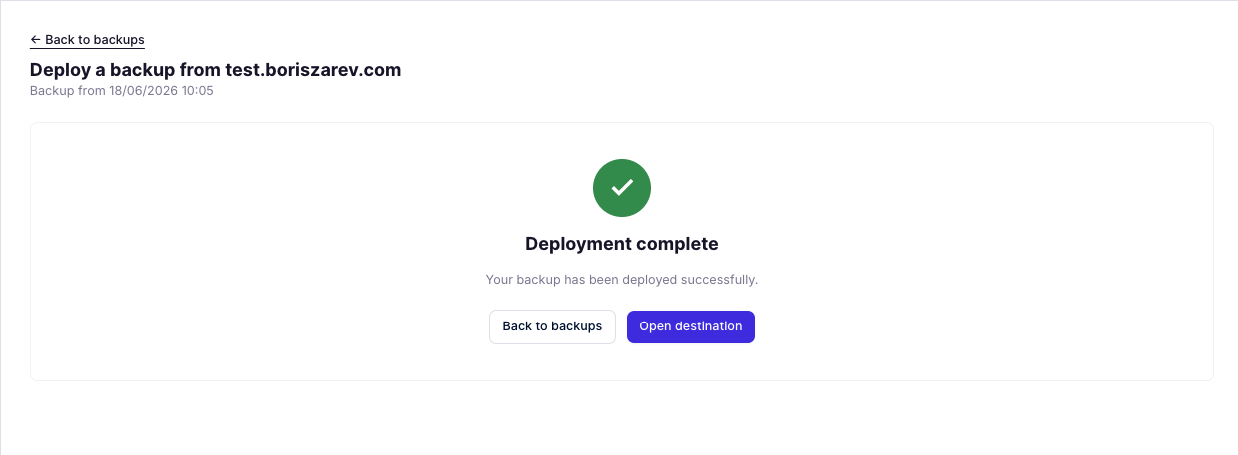
When you see the Deployment complete confirmation screen, your backup has been deployed successfully. Click Open destination to visit your newly deployed site in a new tab and verify everything is working correctly, check your pages, links, images, and login.
Do I need to install WordPress on the destination before deploying?
No. WordPress does not need to be installed at the destination; WP Umbrella deploys a complete copy of your site, including core files and the database. However, if WordPress is already installed there, it will be overwritten by the backup you're deploying, so make sure the destination contains nothing you wish to keep.
Will my URLs and internal links break after cloning to a new domain?
No. WP Umbrella runs an automatic search & replace step during deployment that rewrites the old domain to the new destination URL throughout the imported database. Your internal links, settings, and references are updated to match the new address. For unusual cases, you can define custom search-and-replace rules under Advanced settings before starting.
Are my server and database credentials stored or kept private?
Your credentials are encrypted, and by default, they are deleted after the deployment completes. They are only retained if you explicitly choose Save destination as preset, in which case they're stored (still encrypted) so you can reuse that destination on future deployments without re-entering everything.
What happens if a preflight check fails?
A failed check means WP Umbrella couldn't confirm something about the destination, for example, it couldn't connect via FTP/REST, couldn't run the restore script, or couldn't validate the database credentials. Nothing is changed on the target when a check fails. Review the field tied to the failing check (host, port, path, database name, username, or password), correct it, and click Re-run checks.
Do I have to keep the page open until the deployment finishes?
No. Once the deployment is running, you can safely close the page. The process continues on WP Umbrella's side, and you'll receive an email notification when it's complete. You can also return to the Backups section at any time.
Can I use this feature to create a staging site?
Yes, this is one of the most popular uses of the deployment feature. Simply deploy your live site's backup to a subdomain or separate URL (such as staging.yourdomain.com) to create an identical testing environment. Once you've tested your changes there safely, you can deploy back to production.
Does the destination site need to be connected to WP Umbrella?
No. Only the source site (the one you're deploying from) needs to be connected to WP Umbrella. The destination only requires valid (S)FTP and database credentials, which you provide in the wizard. This is what makes the feature ideal for migrating to brand-new servers or hosting providers.
