Broken links hurt your SEO, frustrate your visitors, and damage your website's credibility. WP Umbrella's Broken Link Checker automatically scans your WordPress site on a regular schedule, identifies broken links and broken images, and gives you the tools to fix them all without leaving your dashboard.
Once enabled, the Broken Link Checker provides:
Automatic, recurring scans of all pages on your site
A detailed list of broken links grouped by page
Link health score and coverage statistics at a glance
Tools to highlight, redirect, or ignore broken links
Bulk management across multiple sites simultaneously
The feature is available per site and can also be enabled in bulk from the global monitoring dashboard.

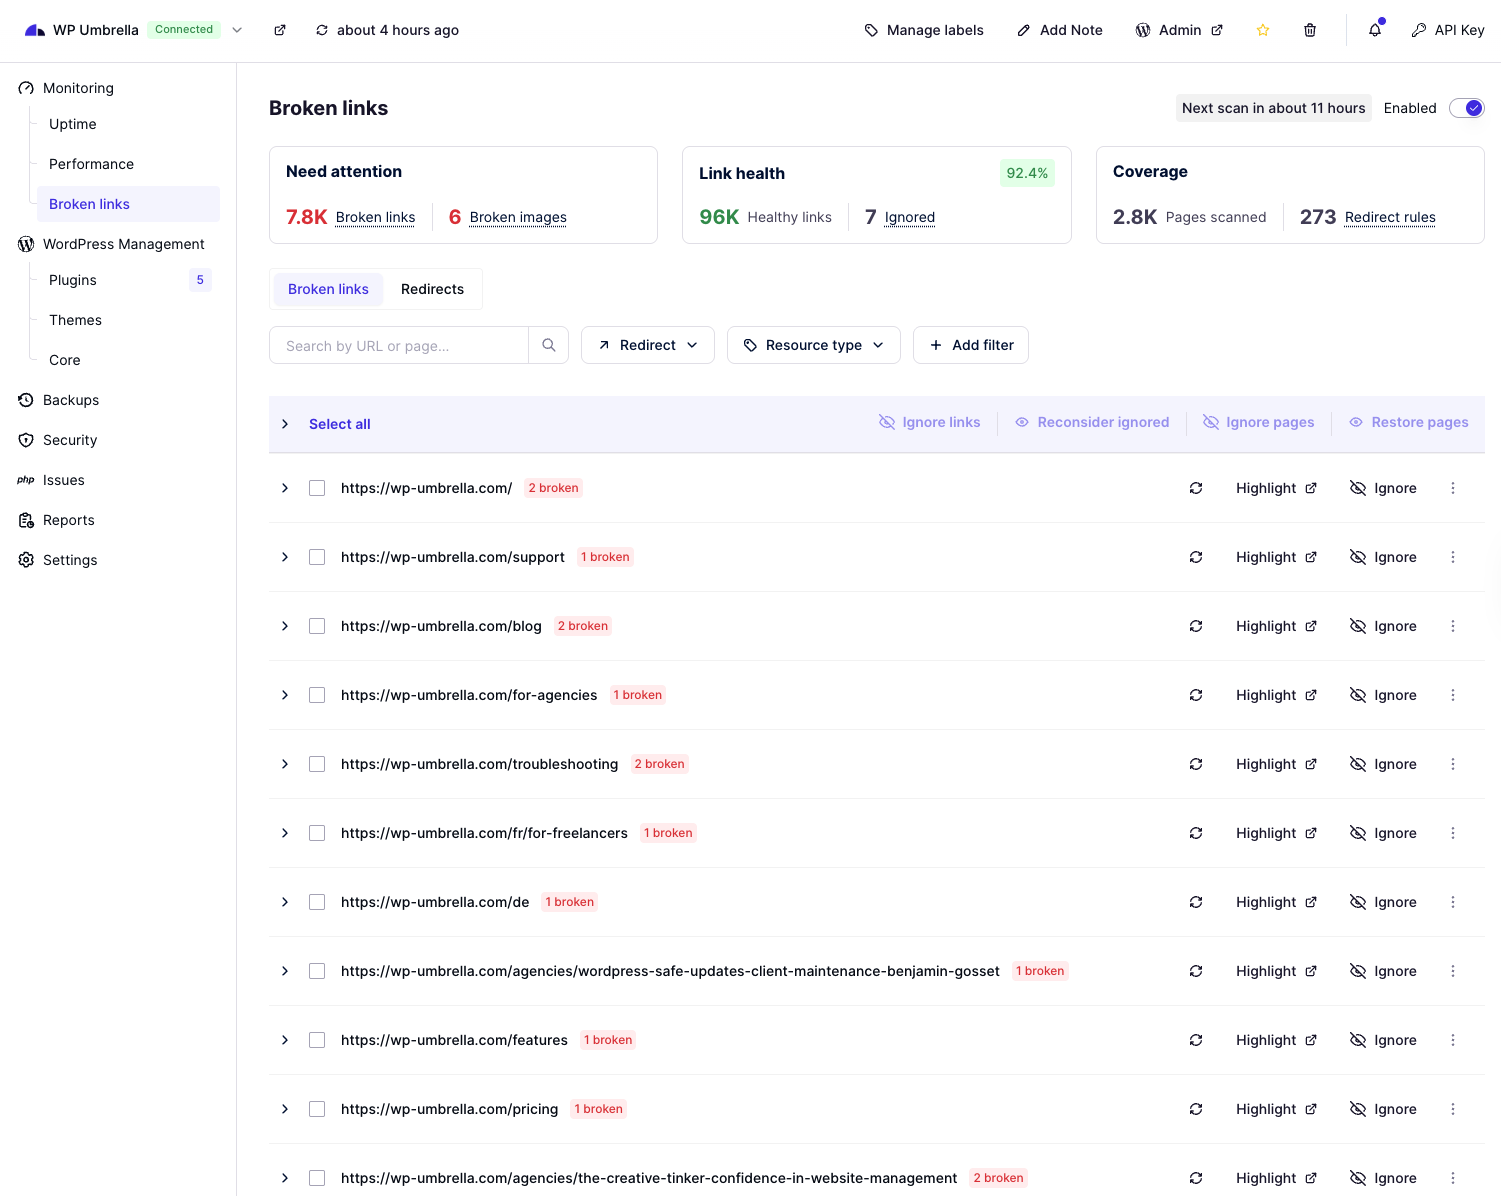
When the Broken Link Checker is active on a site, navigate to a site and click Monitoring > Broken links in the left sidebar to access the full dashboard. At the top, you'll find 3 summary panels:
Displays the total number of broken links and broken images detected across your site. These require action to keep your site healthy.
Shows your link health score as a percentage and a breakdown of:
Healthy links: Links that are working correctly
Ignored: Links you have chosen to exclude from monitoring
Tells you how many pages have been scanned and how many redirect rules are currently in place. This gives you confidence that the checker is covering your full site.
💡 Tip: A high link health score means most of your links are working. Aim to keep this above 95% for optimal SEO performance.

If the Broken Link Checker has not yet been enabled on a site, you will see a prompt screen instead of the broken links list. To activate it for a single site:
Open the site in your WP Umbrella dashboard.
In the left sidebar, go to Monitoring > Broken links.
On the prompt screen, click Enable Broken Link Checker.
The scanner will run automatically and populate your broken links list. The next scan time is shown in the top-right corner of the dashboard.
📝 Note: The Broken Link Checker toggle (Enabled/Disabled) is visible in the top-right corner of the Broken Links page. You can turn it on or off at any time from there.
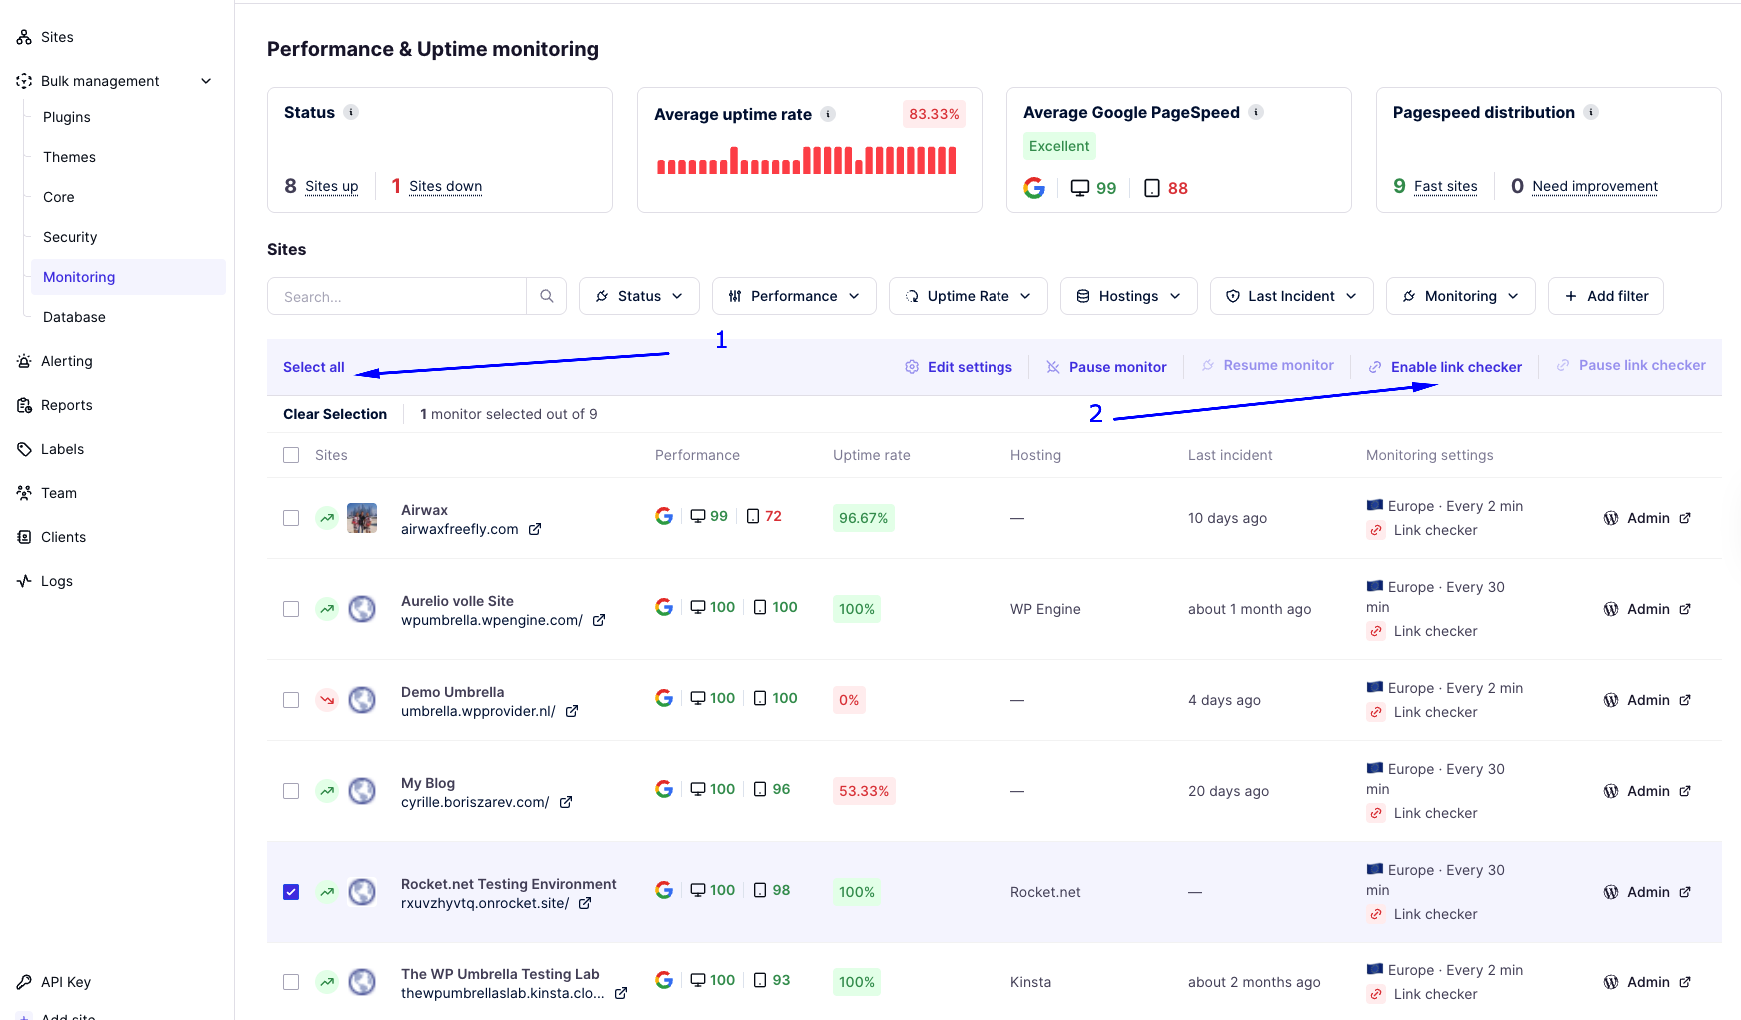
You can enable the Broken Link Checker across all or a selection of your sites simultaneously from the global monitoring view:
In the left sidebar, click Bulk management > Monitoring (or navigate to the main Performance & Uptime Monitoring page).
Use the checkboxes to select the sites you want to enable the checker on. Click Select all to choose all sites at once.
In the bulk action bar that appears at the top, click Enable link checker.
The checker will be activated for all selected sites.
💡 Tip: You can also use Pause link checker from the same bulk action bar to temporarily suspend scanning on selected sites without losing your settings.
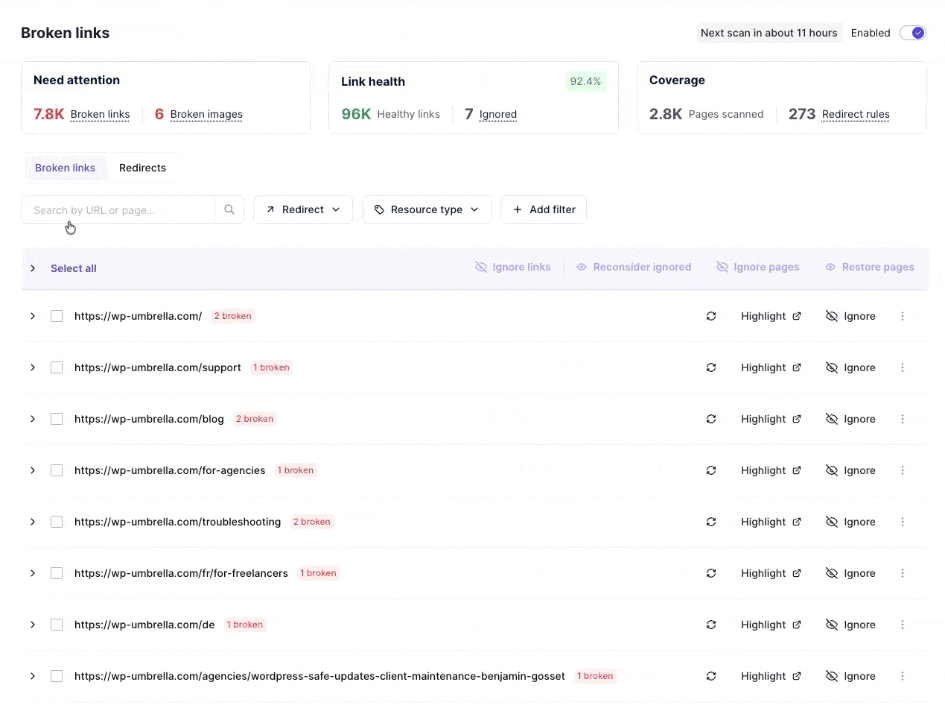
The Broken Links tab (the default view) displays all pages on your site that contain broken links, sorted with the most problematic pages first. Each row shows the page URL and the number of broken links found on that page.

Click the arrow (›) to the left of any page URL to expand it and see every broken link found on that page. For each broken link, you will see:
The broken URL
The anchor text or link label (e.g., "Documentation")
The error type (e.g., Timeout, fetch failed, 404 Not Found)
Use the search bar at the top of the list to quickly find a specific URL or page. You can also filter the list using:
Redirect filter: Show only links that have a redirect applied
Resource type filter: Filter by the type of broken resource (e.g., links, images)
+ Add filter: Add additional custom filters to narrow your results
Click the Redirects tab (next to Broken links) to see a list of all redirect rules you have created. This gives you a quick overview of how broken links are being handled across your site.
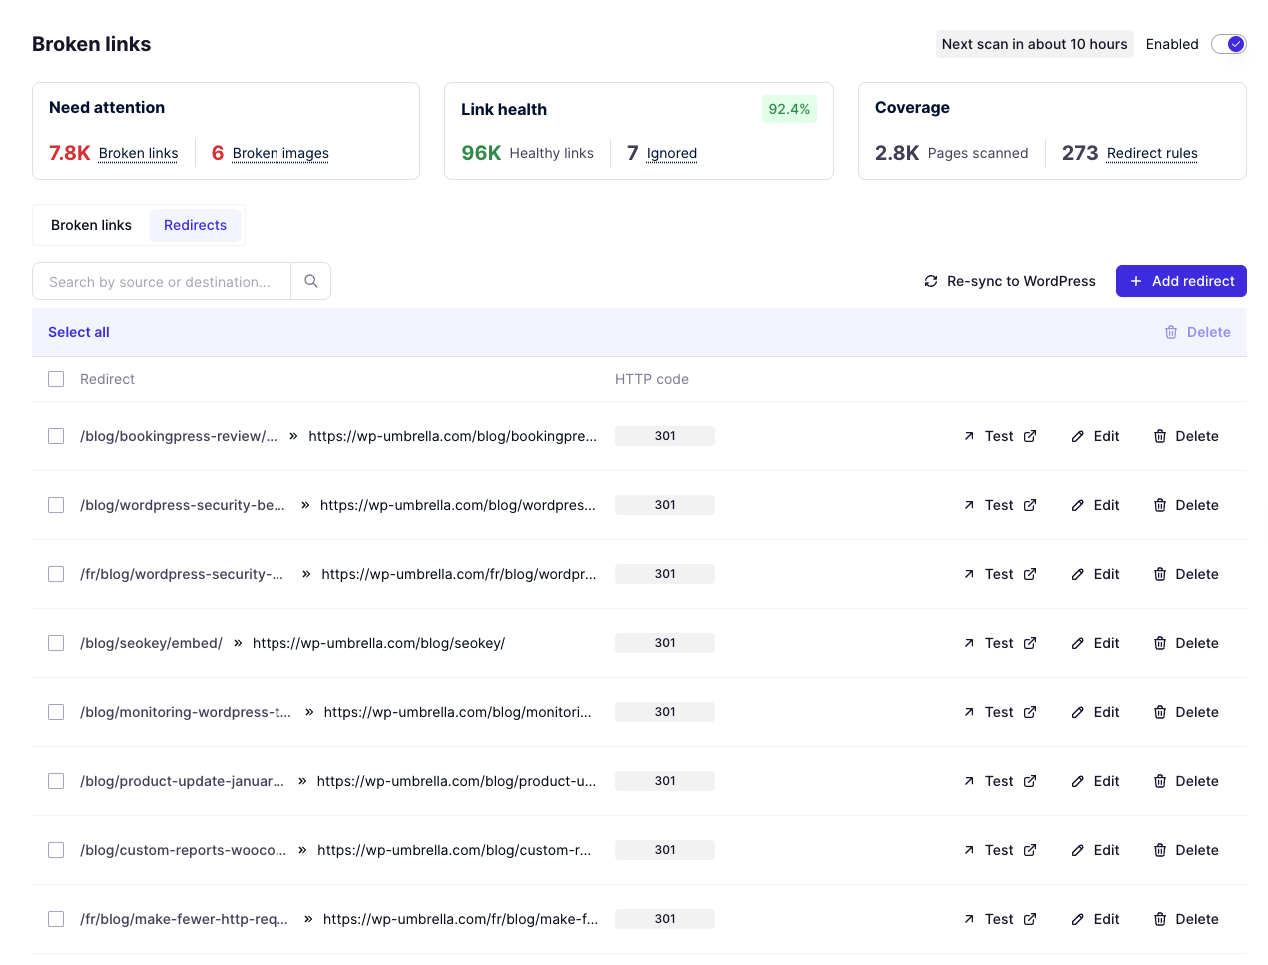
The Redirects List
Each row in the Redirects list represents a single redirect rule and shows:
Source path: The original broken URL (left side of the arrow), e.g. /blog/old-post/
Destination URL: Where visitors and search engines will be sent instead
HTTP code: The type of redirect applied. A 301 means a permanent redirect — the recommended choice for SEO, as it passes link equity to the new URL
Searching Redirects
Use the search bar at the top of the tab to quickly locate a rule by typing either the source path or the destination URL. This is especially handy when you have a large number of redirects and need to find one fast.
Adding a Redirect Manually
Beyond creating redirects directly from a broken link, you can also add rules manually at any time:
Click + Add redirect in the top-right corner of the Redirects tab.
Enter the source path (the old or broken URL) and the destination URL (where it should point).
Save the rule — it will appear in the list immediately and be counted in your Coverage stats.
💡 Tip: Use manual redirects when you know a page has moved but it hasn't been flagged yet by the scanner, or when you want to proactively set up redirects before publishing new content.
Per-Redirect Actions
Each redirect rule has three actions available on the right side of its row:
Test: Opens the source URL in a new browser tab so you can verify the redirect is working correctly and landing on the right destination. Always test after creating or editing a rule.
Edit: Modify the source path or destination URL of an existing redirect. Useful if a destination page moves again or if you made a typo.
Delete: Permanently removes the redirect rule. Use with caution — deleted redirects are not recoverable and visitors will encounter the broken link again until a new rule is created.
Bulk Actions
You can manage multiple redirects at once using the bulk selection tools:
Select all: Selects every redirect rule in the list with one click.
Checkboxes: Use individual checkboxes to select specific rules.
Delete (bulk): Deletes all selected redirects in one action.
📝 Note: Bulk deletion is permanent. Double-check your selection before confirming, especially on sites with a large number of redirect rules.
Re-sync to WordPress
The Re-sync to WordPress button (top-right of the Redirects tab) pushes all your current redirect rules from WP Umbrella directly to your WordPress site. This is useful if you suspect your redirects are out of sync — for example, after a plugin conflict, a site migration, or a manual change made directly in WordPress.
💡 Tip: After making a batch of edits or deletions, always click Re-sync to WordPress to make sure your live site reflects the latest rules.
The Highlight feature opens the broken page in a new browser tab and visually marks the broken link on the live page, making it easy to spot its exact location in the content.
To highlight a broken link:
Find the page containing the broken link in the list and expand it (click ›).
Click Highlight (with the external link icon) next to the broken link.
The page will open in a new tab with the broken link highlighted so you can identify where it appears in your content.
💡 Tip: Use Highlight when you need to manually edit the link in your WordPress editor: it helps you locate the exact location of the broken link on the page without having to search through the content yourself.
When a link is broken because the destination page has moved or been removed, the best fix is often to create a redirect, pointing visitors (and search engines) to the correct URL instead.

To create a redirect:
Expand the page containing the broken link.
Select the checkbox next to the broken link you want to redirect. (You can select multiple links at once.)
Click Create redirect in the action bar that appears.
Enter the destination URL you want to redirect the broken link to.
Save the redirect. It will appear in the Redirects tab and will be counted in your Coverage stats.
📝 Note: The Create redirect option also appears directly in the broken link row for quick access. Look for it after selecting a link with a 'fetch failed' or similar error.
Some broken links may be false positives, external sites that are temporarily down, or links you intentionally want to keep. You can tell WP Umbrella to stop flagging them using the Ignore option.
Expand the page containing the link.
Click Ignore to the right of the broken link.
The link will be moved out of the broken links list and counted in the Ignored total on the Link Health panel.
Select multiple broken links or pages using the checkboxes, then use the bulk action bar at the top of the list:
Ignore links: Ignores the selected individual broken links
Ignore pages: Ignores all broken links on the selected pages
If you want to bring a previously ignored link back into monitoring:
Select the ignored links or pages using their checkboxes.
Click Reconsider ignored in the bulk action bar.
The links will return to the active broken links list and will be checked in the next scan.
If you have ignored entire pages and want to restore them to active monitoring:
Select the relevant pages.
Click Restore pages in the bulk action bar.
All links on those pages will be re-added to the monitoring queue.

The broken links list supports powerful bulk actions to help you manage large sites efficiently:
Select all: Click Select all at the top of the list to select every page and link shown. You can then apply any bulk action to all of them at once.
Select by page: Use the checkbox next to a page URL to select all broken links on that specific page.
Select individual links: Expand a page and check individual links to act on specific broken URLs.
Available bulk actions once items are selected:
Ignore links
Reconsider ignored
Ignore pages
Restore pages
💡 Tip: Use Select all combined with Ignore links to quickly clear out a large number of false positives in one action, then use Reconsider ignored to bring specific ones back if needed.
How often does the Broken Link Checker scan my site?
We run the scan once it’s enabled, and then every 24 hours. The next scheduled scan time is shown in the top-right corner of the Broken Links page.
What does 'fetch failed' mean?
'Fetch failed' means the scanner was unable to retrieve the linked page at all, typically because the URL does not exist or the server is unreachable. 'Timeout' means the server took too long to respond. Both indicate a link that needs attention.
Will ignoring a link affect my SEO?
Ignoring a link in WP Umbrella only suppresses it from appearing in your dashboard. It does not fix the link on your actual website. Visitors and search engines will still encounter the broken link. We recommend creating a redirect or updating the link in your content instead.
Can I enable the Broken Link Checker on a disconnected site?
The Broken Link Checker requires an active connection between your site and WP Umbrella. If a site is showing as Disconnected, you will need to reconnect it first before you can enable or use the feature.
